How to Choose Vacuum Insulated Panels for Walls?

How to Choose Vacuum Insulated Panels for Walls?

Choosing Vacuum Insulated Panels For Walls is not simply a matter of picking the highest advertised R-value. The right panel must suit the wall’s dimensions, climate, moisture conditions, and installation method. A small puncture can reduce a panel’s performance, so careful handling matters. So do the joints.

Building-science expert Dr. John Straube is known for evaluating whole building assemblies. A practical paraphrase of that approach is: “Judge the complete wall, not the insulation panel alone.” This is not a verbatim quotation. It highlights a useful check: compare the wall’s effective thermal performance, including edges, seams, and framing, rather than relying only on a panel’s center-of-panel rating. Also confirm that the proposed facing, thickness, and fixing details work with the rest of the wall.

Ask suppliers for product data, durability information, and installation instructions. Check how panels can be cut or fitted around windows, corners, and services; many vacuum panels cannot be trimmed on site. Look closely at the details. A narrow gap can matter.

This guide explains how to compare panel performance, formats, edge effects, and practical constraints. It also considers moisture management and compatibility with other insulation layers. Requirements vary by project, and product claims need checking against independent test data. One point is easy to underestimate: a high-performing product can still disappoint when the design or installation is rushed. That deserves a second look.
How to Choose Vacuum Insulated Panels for Walls?

Understand How Vacuum Insulated Panels Work in Wall Assemblies

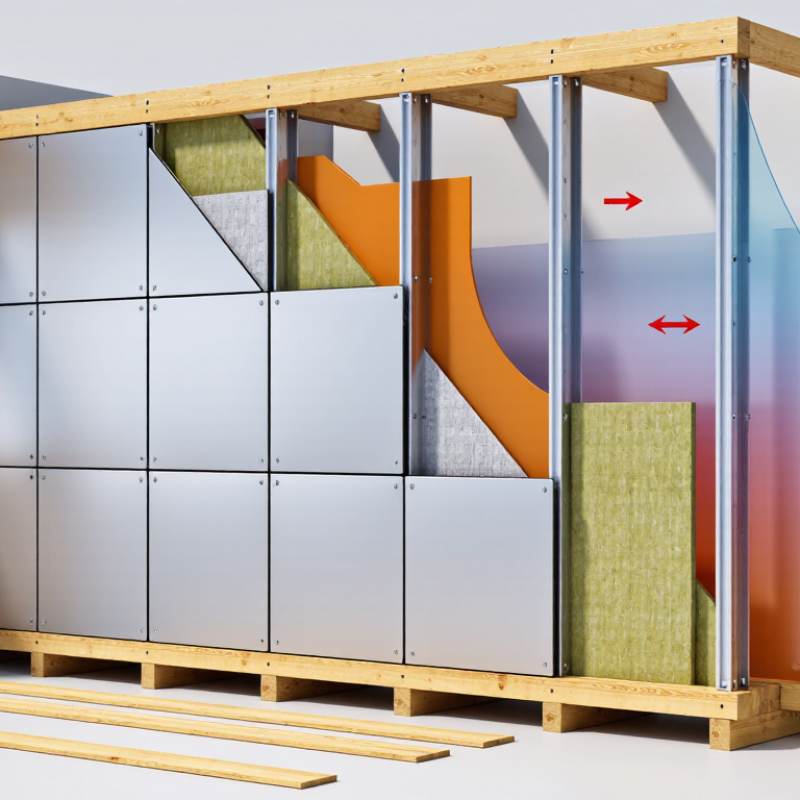
Vacuum insulated panels (VIPs) use a porous core sealed inside an evacuated, gas-tight envelope. Removing most internal gas reduces heat transfer through the core, while the solid material limits conduction. A technical review by Baetens and colleagues reports center-panel thermal conductivity around 0.004–0.008 W/(m·K), depending on product and condition. That high performance depends on an intact envelope. Edges matter.

In a wall, VIPs are usually placed as a continuous layer, with joints carefully coordinated around windows, corners, and fixings. They cannot be cut on site: one screw or saw nick can admit air and moisture, reducing performance. The IEA EBC Annex 65 report highlights aging and edge effects as important factors in long-term performance. Small gaps count. Designers should assess the whole assembly, not just the panel’s center value, and limit thermal bridges at panel edges and fasteners. A neat drawing can still hide a weak joint; that detail deserves a site check.

How to Choose Vacuum Insulated Panels for Walls?

Understand how vacuum insulated panels work in wall assemblies

Lower thermal conductivity means better insulation per unit thickness. Vacuum insulated panels (VIPs) can provide very high thermal resistance in a thin profile, but their performance depends on panel condition, joints, and edge details. Values shown are representative approximate material values; actual product ratings vary, and a wall’s overall performance also depends on the complete assembly.

Define the Wall’s Thermal, Structural, and Space Requirements

Start with the wall assembly, not the panel’s headline rating. The IEA’s 2023 Global Status Report for Buildings and Construction estimates that building operations use about 30% of global final energy. Set a target U-value for the local climate, then account for framing, joints, and fixings. Small bridges matter. Baetens and colleagues’ 2010 review in Energy and Buildings reports fresh VIP core conductivity near 0.004 W/m·K. That figure is not the whole-wall performance: panel edges, aging, and installation gaps can raise heat flow.

Next, define what the wall must carry and how much thickness it can spare. VIPs are insulation, not structural sheathing; confirm the backing, cladding, wind loads, and attachment system with the project engineer. Map windows, sockets, corners, and service routes before specifying panel sizes. A puncture can sharply reduce performance, and panels generally cannot be cut on site. Measure the available depth at real openings, not just on drawings. Details matter. A perfect spreadsheet can still miss a crooked masonry joint. Allow for tolerances, protect panels during installation, and compare tested assembly data rather than relying only on center-panel conductivity.

Compare Panel Thickness, R-Value, Sizes, and Core Materials

Vacuum insulated panels can deliver high thermal resistance in a thin wall, but compare whole-panel performance, not just the center value. The IEA EBC Annex 65 report describes VIP thermal conductivity in the range of roughly 0.004–0.008 W/(m·K), depending on condition and construction. Thin panels save interior space. Yet seams, fixings, and damaged envelopes can reduce real-world performance. Fit matters.

Check thickness and stated R-value together, and confirm whether the figure applies to the panel center or the complete panel. Baetens and co-authors’ review in Energy and Buildings (2010) notes that edge thermal bridges can make whole-panel performance poorer than center-of-panel results. Compare drawings against wall dimensions before ordering; standard sizes may leave awkward gaps around windows and corners.

Core materials also matter: fumed silica, glass fiber, and other porous cores differ in handling, moisture response, and long-term performance. Ask for test conditions and aged values, not only a fresh-panel specification.

I would not treat one datasheet number as a promise for an installed wall. That distinction is easy to miss.

Assess Durability, Moisture Risks, Fire Safety, and Compatibility

A vacuum insulated panel can deliver high thermal resistance in a slim wall, but its performance depends on an intact envelope. A small puncture from a screw or saw can compromise the vacuum. Plan panel dimensions around windows, corners, and service routes before installation. Keep a clear record of panel locations; a stud finder may not reveal every hidden edge.

Moisture deserves equal attention. Check how the wall handles rain, indoor vapor, and drying, especially around joints and window openings. Do not assume the panel itself solves condensation risks. Compatibility matters, too: confirm that adhesives, tapes, and adjacent membranes suit the panel’s facing and expected temperatures.

Fire safety needs evidence. Review test data for the complete wall assembly, not just the panel core, and keep penetrations consistent with the tested design.

Details can shift on site. That is where plans sometimes fall short. A qualified building professional can check climate conditions, installation limits, and likely repair needs before panels are ordered.

Review Installation Details, Costs, and Manufacturer Support

Vacuum insulated panels can deliver high thermal resistance in a thin wall, but installation details matter. Check how panels fit around windows, corners, outlets, and floor edges. Even small gaps can create thermal bridges. Ask for drawings that show joints, fastening points, and how the panels connect to the rest of the wall assembly. Panels are usually difficult to cut on site, so confirm dimensions before ordering. I would not rely on the R-value alone.

Tips: Measure twice. Keep a clear panel layout on site, and protect panels from punctures during handling. Ask the installer how damaged panels will be identified and replaced.

Compare the full installed cost, not just the price per panel. Include labor, delivery, compatible finishes, and any extra work needed for a precise fit. Request written guidance on storage, installation limits, and warranty conditions. Manufacturer support is especially useful when plans change or a panel arrives damaged. Find out who answers technical questions, how quickly they respond, and whether they can review your wall details before work begins. It is easy to overlook this support until there is a problem. A lower quote may still make sense, but unclear installation help deserves a closer look.

How to Choose Vacuum Insulated Panels for Walls? — Installation Details, Costs, and Manufacturer Support
Selection factor Typical data or benchmark Installation and design review Cost and manufacturer support
Thermal performance Commercial VIPs commonly report a center-of-panel thermal conductivity around 0.004–0.008 W/(m·K). Verify the declared value, test method, and whether it is an initial or aged value. Use the design value for the complete wall assembly, not just the center-of-panel figure. Account for joints, panel edges, fasteners, and other thermal bridges. Request product-specific technical data and assembly calculations. Do not compare quotations using conductivity figures with different test conditions.
Panel thickness and layout Many wall applications use panels approximately 10–50 mm thick; available sizes and thicknesses depend on the product and project. Prepare a panel layout before ordering. Coordinate panel dimensions with openings, corners, services, and the wall’s framing or support system. Ask for a project-specific panel schedule, quantity take-off, and guidance on allowable tolerances and spare panels.
Panel protection VIPs rely on a sealed, evacuated envelope. A puncture or damaged seal can substantially reduce that panel’s insulating performance. Do not cut, drill, nail, or screw through a panel. Protect panels from sharp edges and job-site damage, and plan service routes outside the VIP layer. Confirm packaging, handling instructions, inspection procedures, and the process for reporting damaged panels before delivery.
Joints and thermal bridges Panel joints and edges can reduce the effective thermal performance of the wall compared with the center of a panel. Follow the specified joint pattern and edge details. Avoid unplanned gaps, and use only compatible joint materials and supplementary insulation where the design calls for it. Request junction details for corners, floor lines, window reveals, and other transitions; include the detailing labor in the estimate.
Moisture and wall assembly Moisture control depends on the complete wall design, climate, indoor conditions, and placement of vapor-control layers. Check condensation risk and drying potential for the specific wall assembly. Coordinate air, water, and vapor control layers with local building requirements. Ask for assembly-specific guidance rather than assuming a generic wall detail will suit every climate or construction type.
Fire and finish protection Fire performance and permitted use depend on the panel product and the complete wall assembly; local codes govern compliance. Confirm required protective layers, cladding, cavity details, and fire-stopping provisions before installation. Do not leave panels exposed unless the approved design permits it. Request applicable test reports and written confirmation that the proposed assembly meets project and code requirements.
Cost and whole-project estimate VIP costs vary by specification, panel size, order quantity, location, and project complexity; there is no reliable universal installed price. Compare the complete installed wall cost, including support layers, protective finishes, compatible joint materials, specialist labor, and any additional insulation. Obtain itemized project quotations. Check delivery charges, lead time, minimum order quantities, waste allowance, and replacement-panel costs.
Technical and after-sales support Support quality should be assessed using documented product data, installation guidance, and clear warranty terms. Confirm that installers can access current drawings, handling instructions, and technical help during layout and installation. Review warranty coverage, exclusions for punctures or improper installation, claims procedures, technical response times, and availability of replacement panels.
Best-fit project conditions VIPs are most attractive where high thermal resistance is needed in a limited thickness and the panel layer can be carefully protected. They may be less suitable where frequent cutting, drilling, future alterations, or rough handling is likely. Compare against alternative insulation systems using the required wall thickness, project budget, installation risk, and long-term maintenance needs.

Note: Figures are general selection benchmarks, not a product specification. Confirm current performance, code compliance, installation requirements, and pricing with the supplier for the proposed wall assembly.